本篇文章將說明:
4. 安裝 hexo 主題 minos
5. 客製化網域名稱設定
6. Cloudflare SSL 免費憑證設定
安裝 hexo 主題 minos
在自己的專案資料夾底下把主題包 git clone 下來並放置到主題資料夾底下
1 | cd ~/github/elliesu_blog |
使用 2.4.0 版本(安裝當時最新版),並把 minos 主題加為專案的子模組(也可以選擇不加)
1 | git checkout 2.4.0 |
複製主題資料夾底下的 _config.yml.example 檔案,並把檔名更改為 _config.yml
1 | cp themes/minos/_config.yml.example themes/minos/_config.yml |
將此專案的 _config.yml 主題更新為 minos,注意!是此專案的 _config.yml,不是 minos 資料夾內的喔!
1 | theme: minos |
現在就可以試著預覽看看網站的新衣吧!
1 | hexo server |
遇到問題一:
ERROR Package hexo-renderer-sass is not installed.
ERROR Please install the missing dependencies in the root directory of your Hexo site.
解決: minos 有使用 hexo-renderer-sass 套件,需要另外安裝在主資料夾底下
1 | npm install --save hexo-renderer-sass |
遇到問題二:
ERROR Package cheerio is not installed.
ERROR Please install the missing dependencies in the root directory of your Hexo site.
解決: minos 有使用 cheerio 套件,需要另外安裝在主資料夾底下
1 | npm install cheerio |
主題相關設定可參考 Configuring Minos
minos 主題 _config.yml 調整
- 設定 logo 名稱
- 關閉分享功能
- 關閉留言功能
1
2
3
4
5
6
7
8
9
10
11
12logo:
text: Ellie's Note
# Share plugin settings.
share:
# type: sharethis
# install_url:
# Comment plugin settings.
comment:
# type: disqus
# shortname:
客製化網域名稱設定
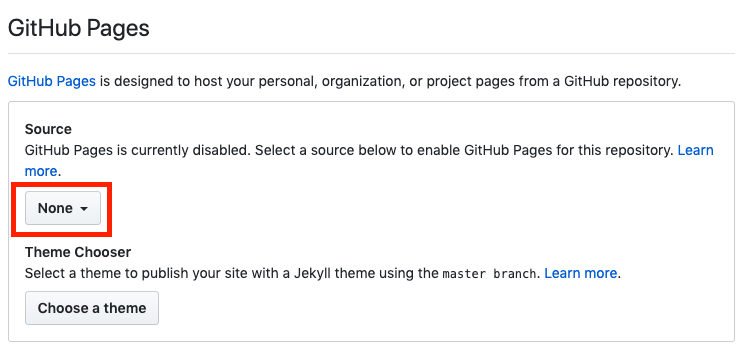
如果你的網域名稱不需要客製化的話,每個 GitHub 帳號都會有一個免費的 GitHub Pages 可以使用,但只能用於靜態網站,使用方式很簡單,只需要前往自己的 Git Repository -> Setting -> GitHub Pages 設定要發布的分支即可
現在可以試著用https://[your_account].github.io/[your_repository]進入這個靜態網站
客製化網域名稱首先須先準備一個購買好的網域,這邊使用 Godaddy 購買
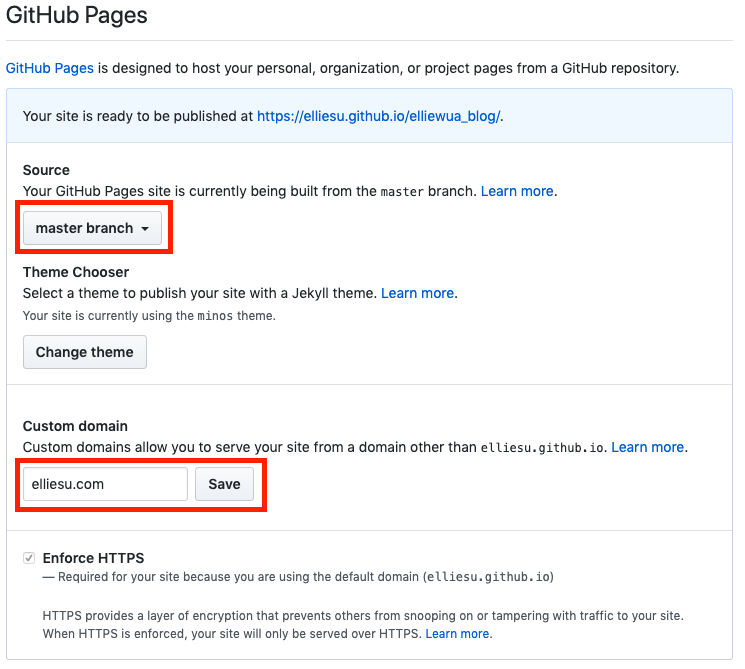
一樣是在 Git Repository -> Setting -> GitHub Pages -> Custom domain 填上自訂網域
使用 hexo 框架的話,需在專案的 source 資料夾下新增檔案 CNAME
1
2cd source
touch CNAME
CNAME 檔案內容
1 | elliesu.com |
- 到自己的網域商(這邊使用 Godaddy)選擇 網域 DNS 管理,新增類型 A,名稱(主機) 填 @ 表示自己,指向 GitHub 主機 185.199.108.153,TTL 設為 600 秒
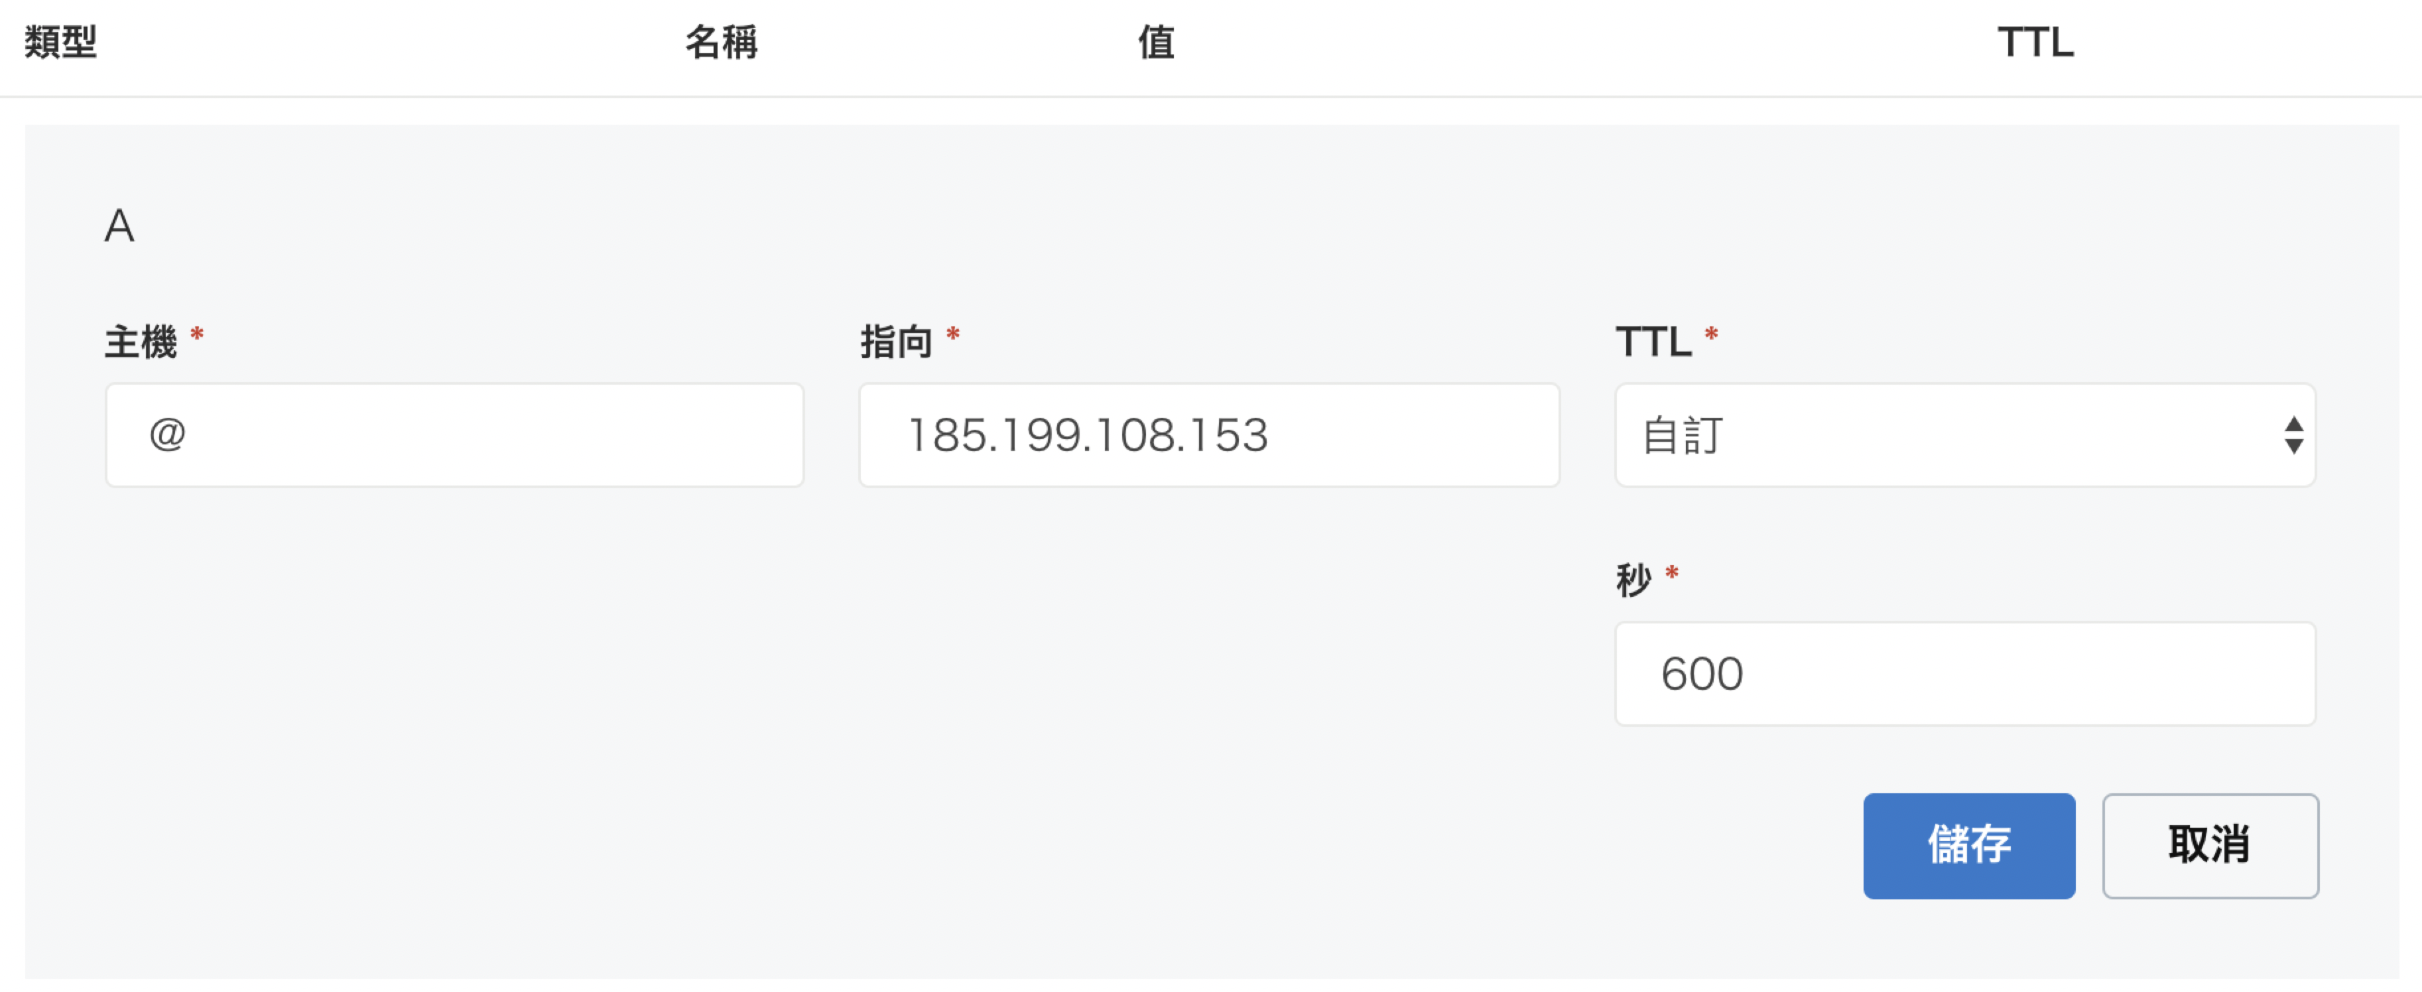
這邊 CNAME 可新增 www 也可不新增,www.elliesu.com 預設會指向 elliesu.com
可於終端機執行下列命令
1 | dig www.elliesu.com +nostats +nocomments +nocmd |
未於 Godaddy 設定前顯示如下,此時進入 elliesu.com 會導向 Godaddy
於 Godaddy 設定後,後續又新增另外三個 GitHub 主機,顯示如下
使用 dig 指令檢視網域狀態,皆已成功連結

檢視 www.elliesu.com 狀態

Github 原先的 DNS Server IP: 192.30.252.153、192.30.252.154
後來可能是因為 Github 被微軟買走,主機跟著遷徙,導致主機的 ip 位置也跟著改
所以 ip 改為: 185.199.108.153、185.199.109.153、185.199.110.153、185.199.111.153
前面設定 DNS 時有看到一個名稱叫做 TTL,它是什麼呢?
存留時間 TTL 是 DNS 紀錄中用來定義 DNS 紀錄的後續變更生效前的秒數。在您的網域中,每個 DNS 紀錄(例如 MX 紀錄、CNAME 紀錄等)都具有 TTL 值,其決定了您對紀錄所做的變更需要多久才會生效。舉例來說,如果一個紀錄的 TTL 為 86400 秒,則變更將需要 24 小時才會生效
請注意,變更任一紀錄的 TTL 將影響「往後」任何變更生效所需要的時間。建議您將 TTL 值設定為 3600,告知網路上的伺服器每小時檢查更新紀錄。這意味著當您下次更新紀錄,您的變更將會在一小時後生效。如要縮短往後變更生效所需的時間(比如您想要儘快還原某個變更),您可以設定較短的 TTL,例如 300 秒(5 分鐘)
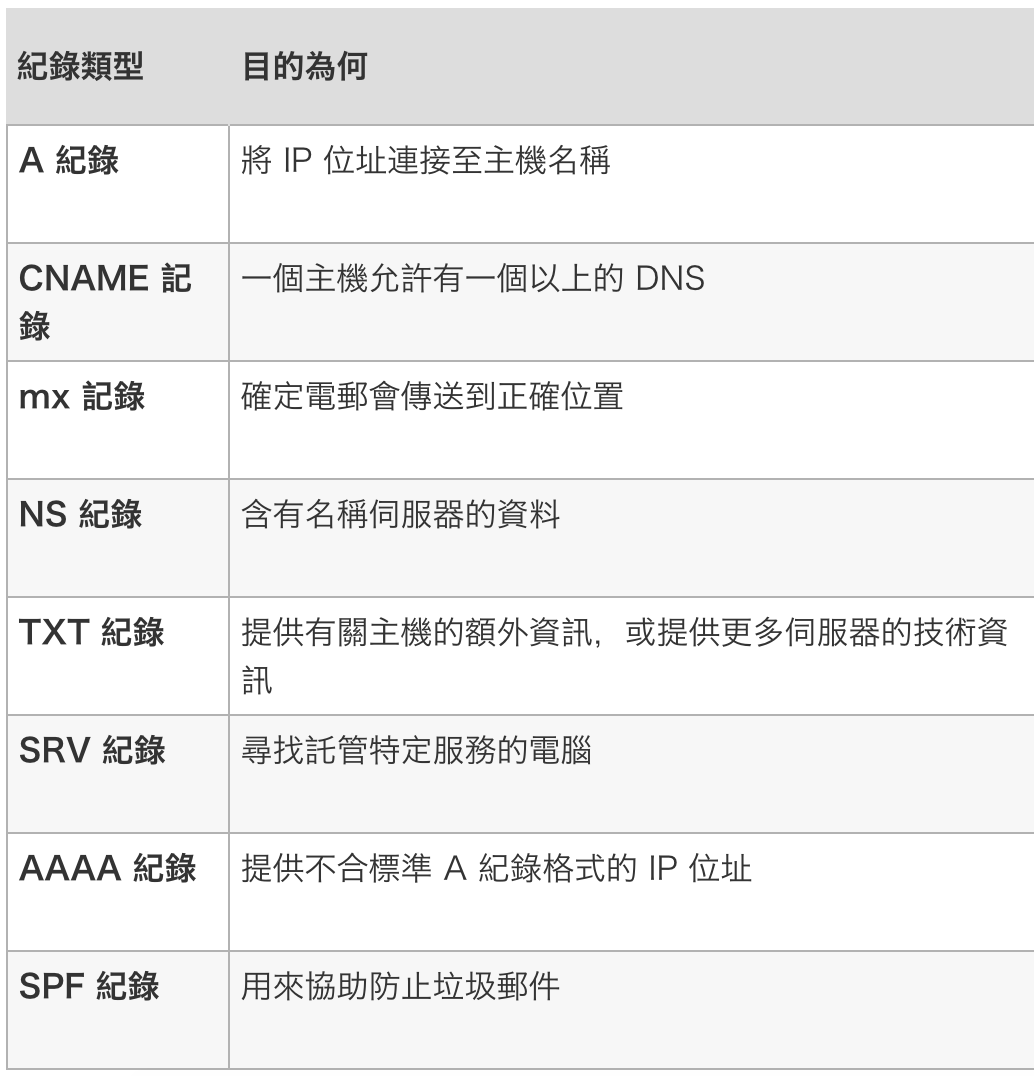
DNS 記錄類型
Cloudflare SSL 免費憑證設定
目前我們已經成功客製化網域名稱了,如果你需要將你的網站更改為 https,則需要使用 SSL 憑證,以下使用 Cloudflare
- 註冊 Cloudflare
- 輸入網域名稱,Cloudflare 會偵測到目前的設定,點選左下角 Continue -> 選擇 Default method,按照 Cloudflare 步驟修改

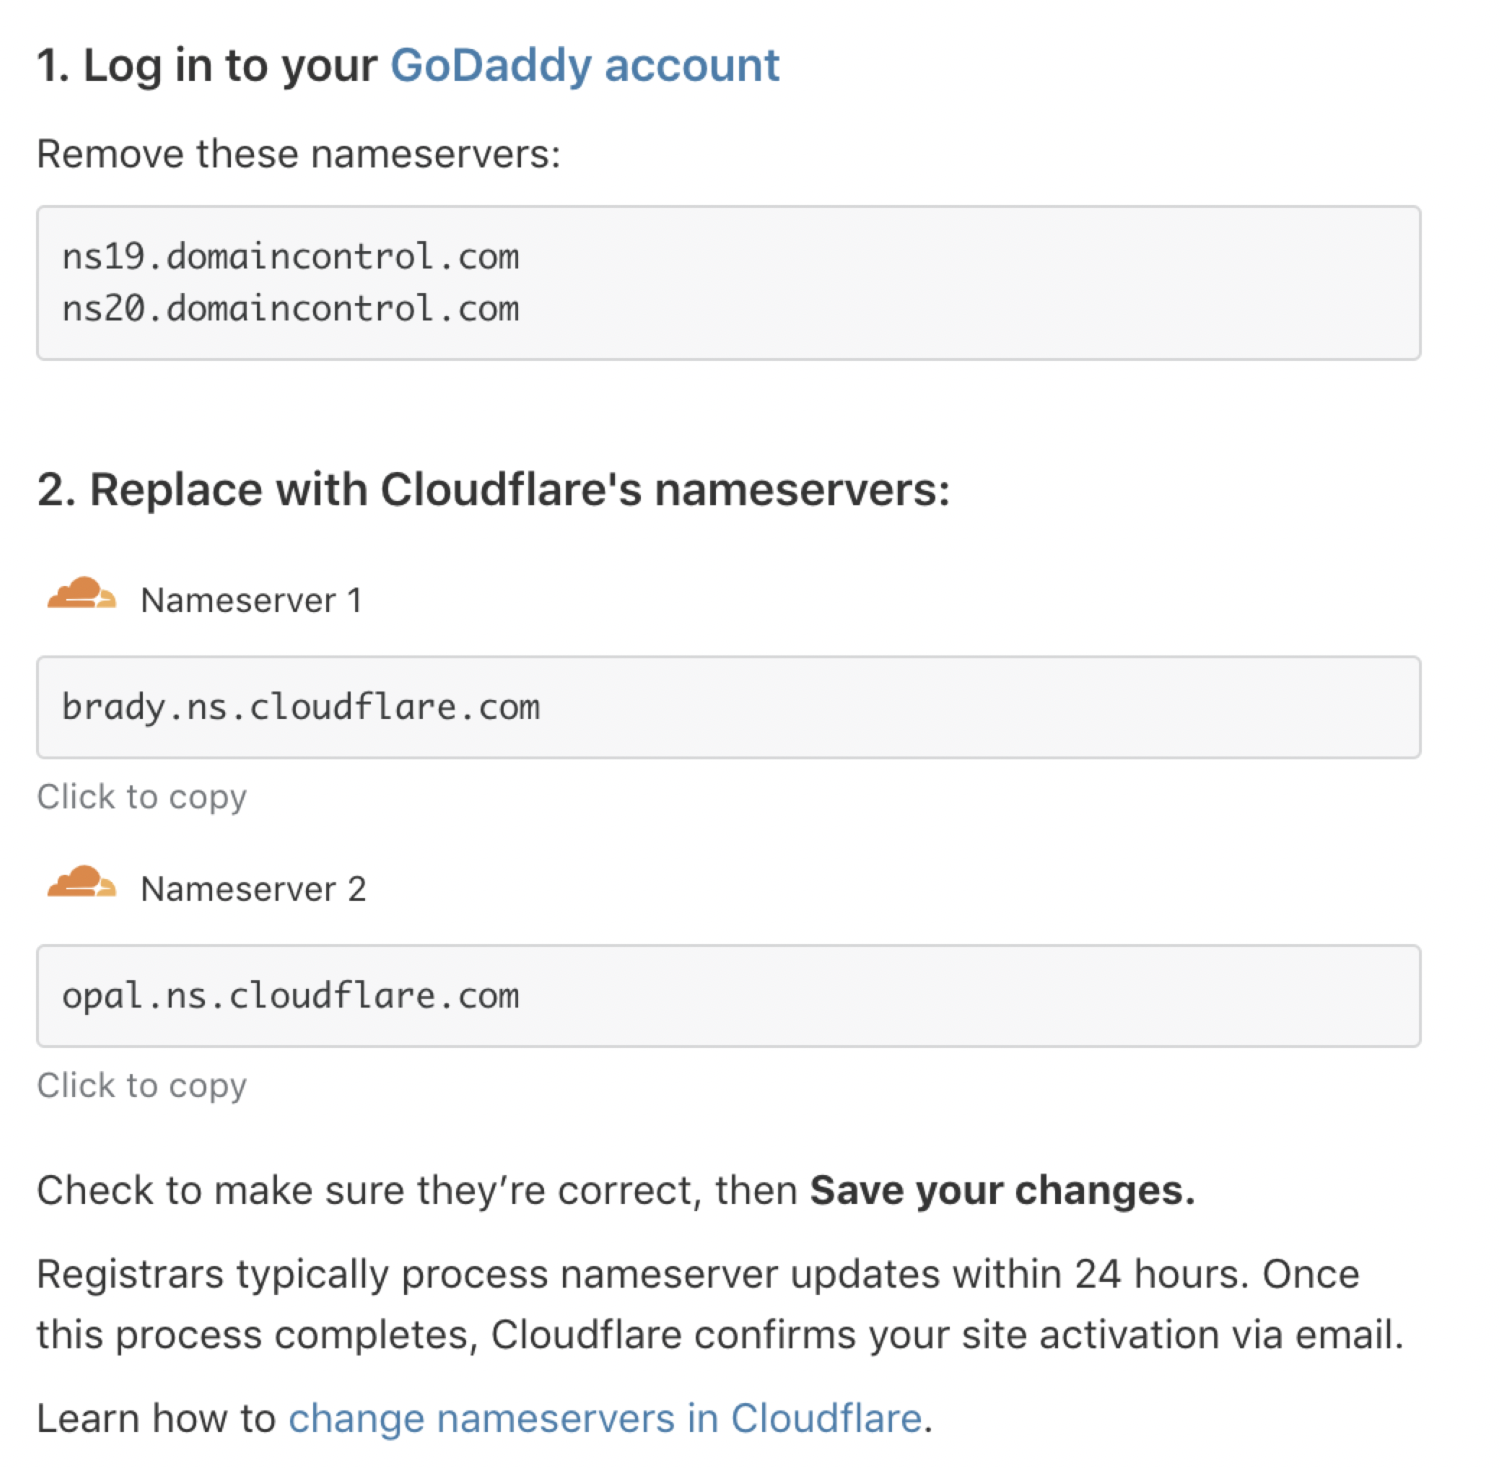
- 進入 Godaddy 網域管理頁面,變更網域名稱伺服器 -> 輸入我自己的名稱伺服器(進階),將步驟 2 中 Cloudflare 提供的伺服器名稱貼入,設定完成後,Godaddy 會顯示下列畫面


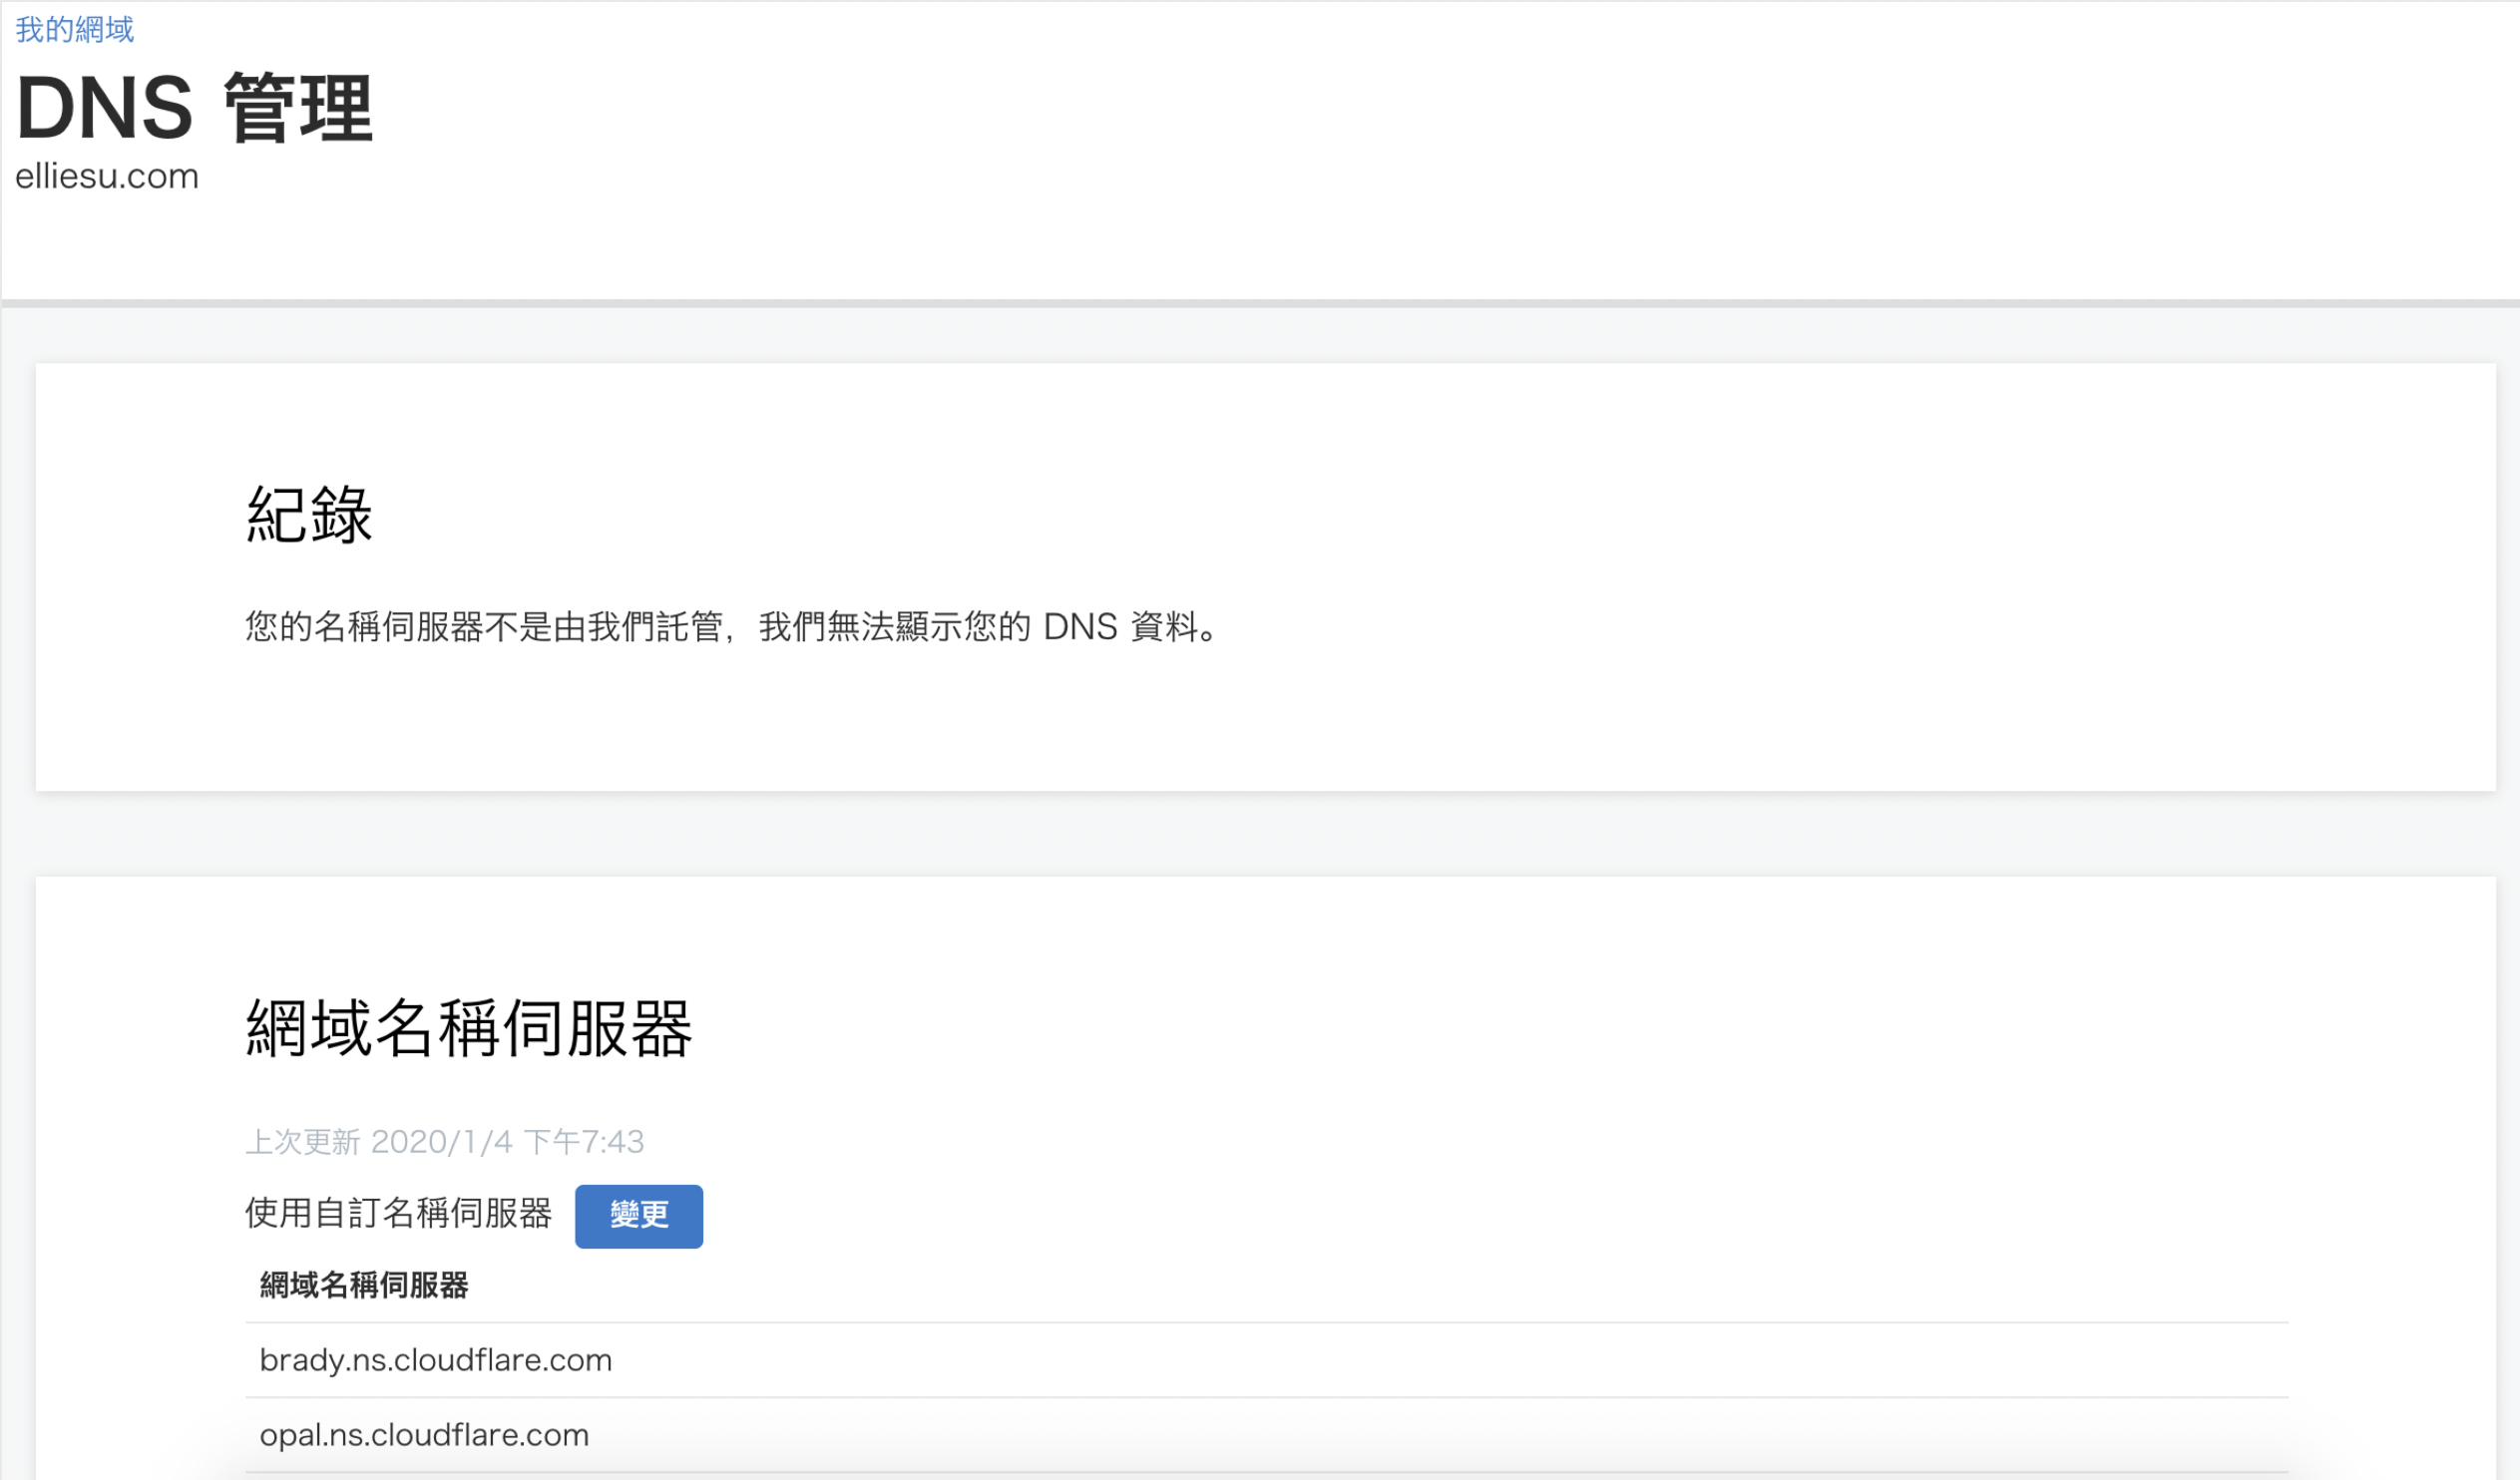
- 回到 Cloudflare,點選 re-checked,等待 Cloudflare 成功偵測到網域伺服器名稱已變更,約需三至五分鐘

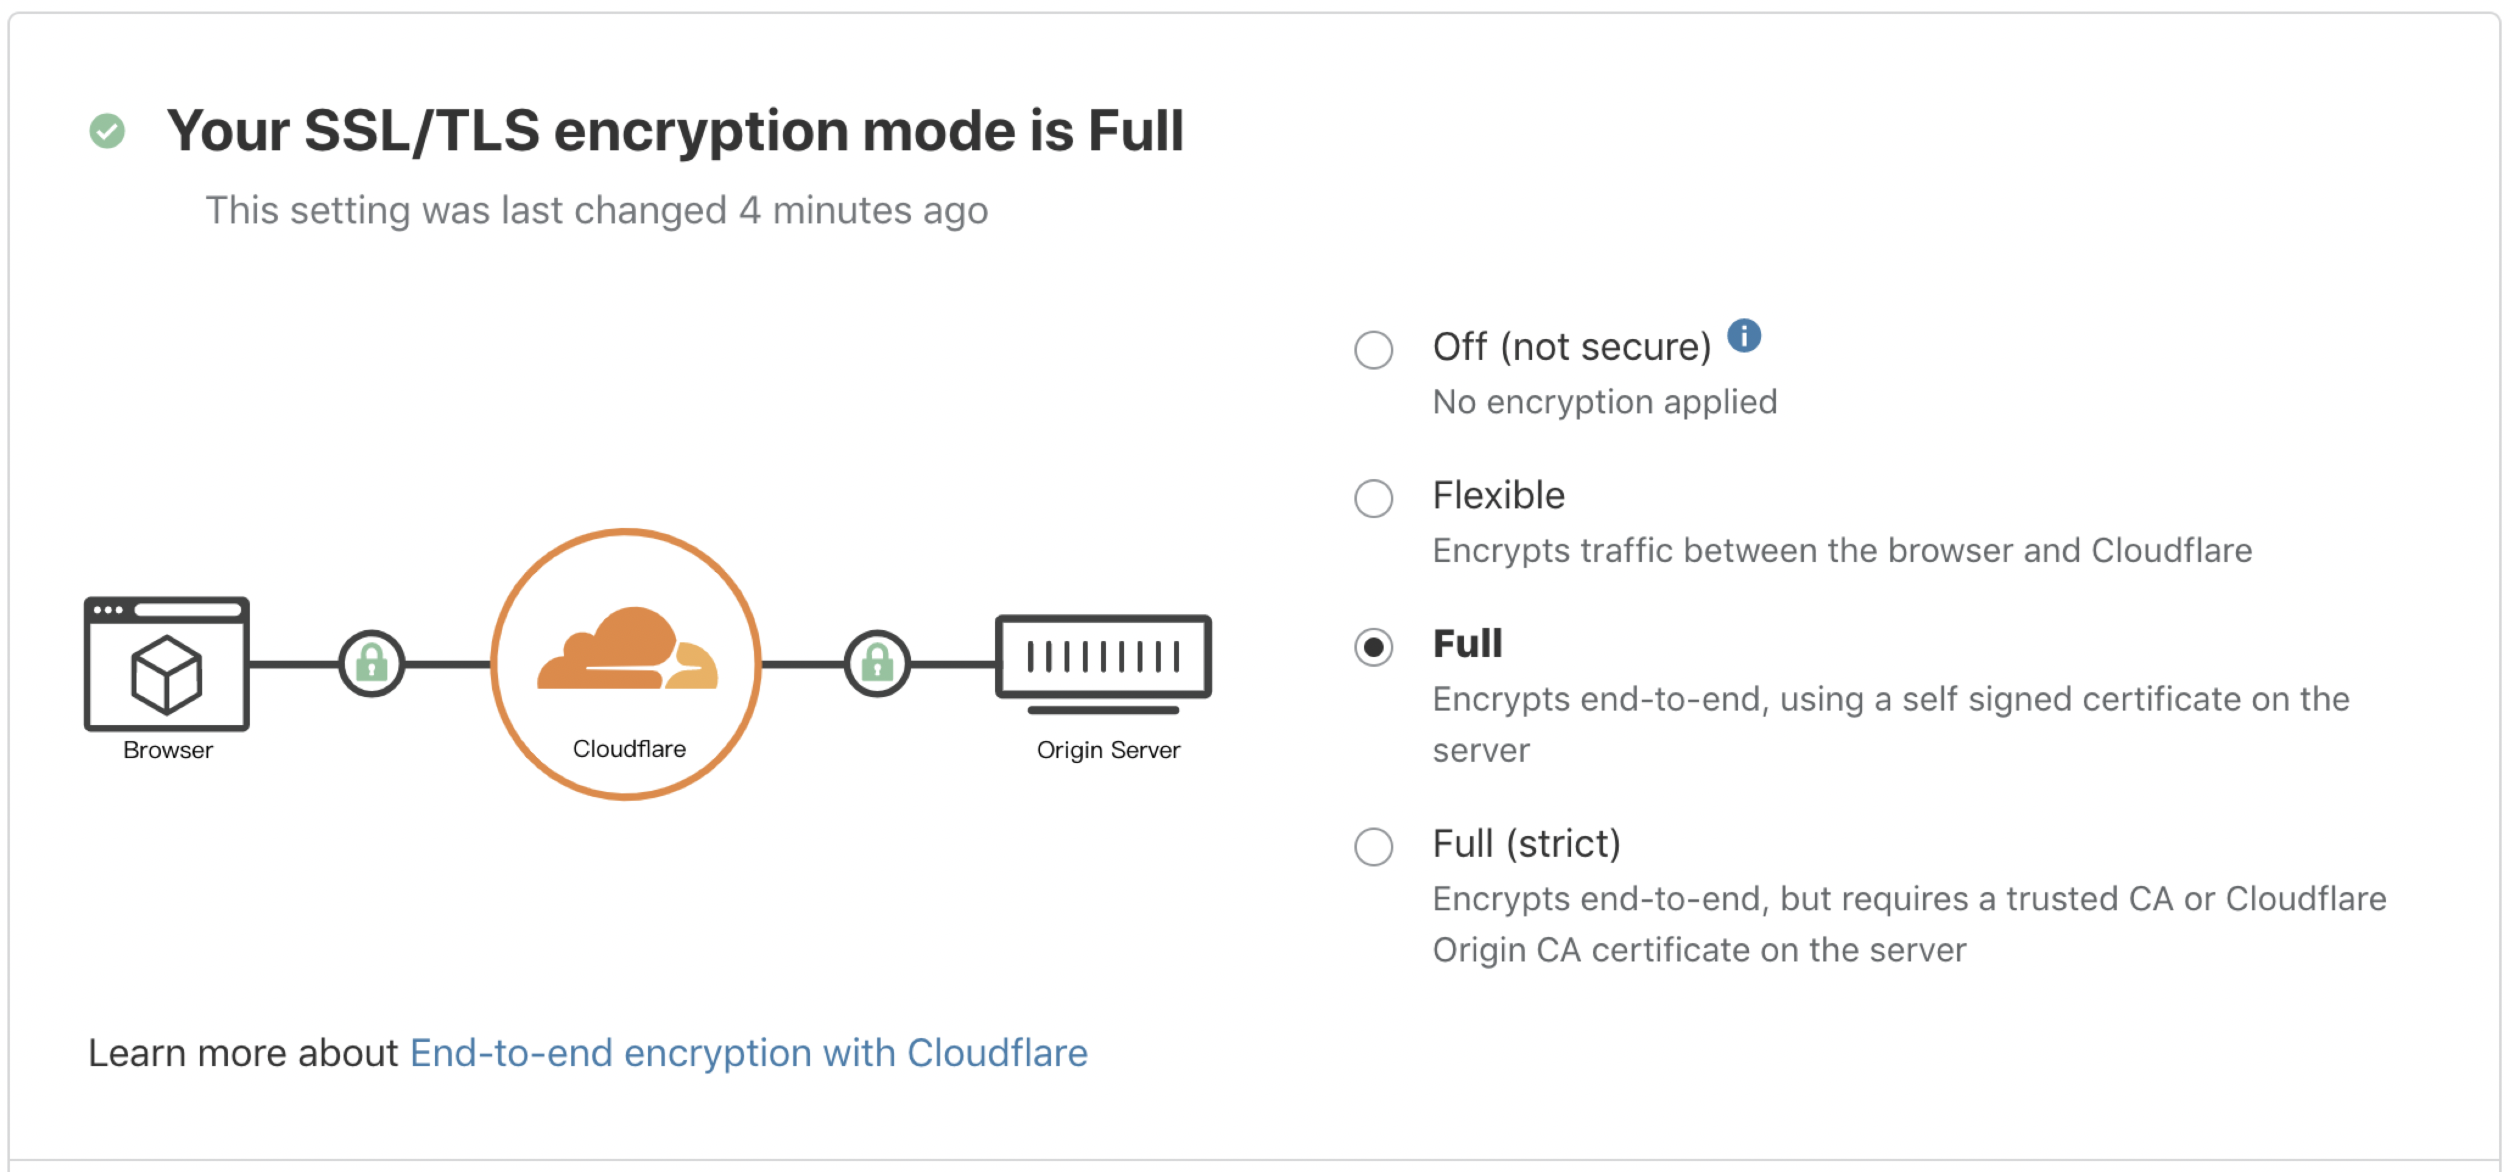
- 設定 Cloudflare SSL,上排選單選擇 SSL/TLS,選擇 Full
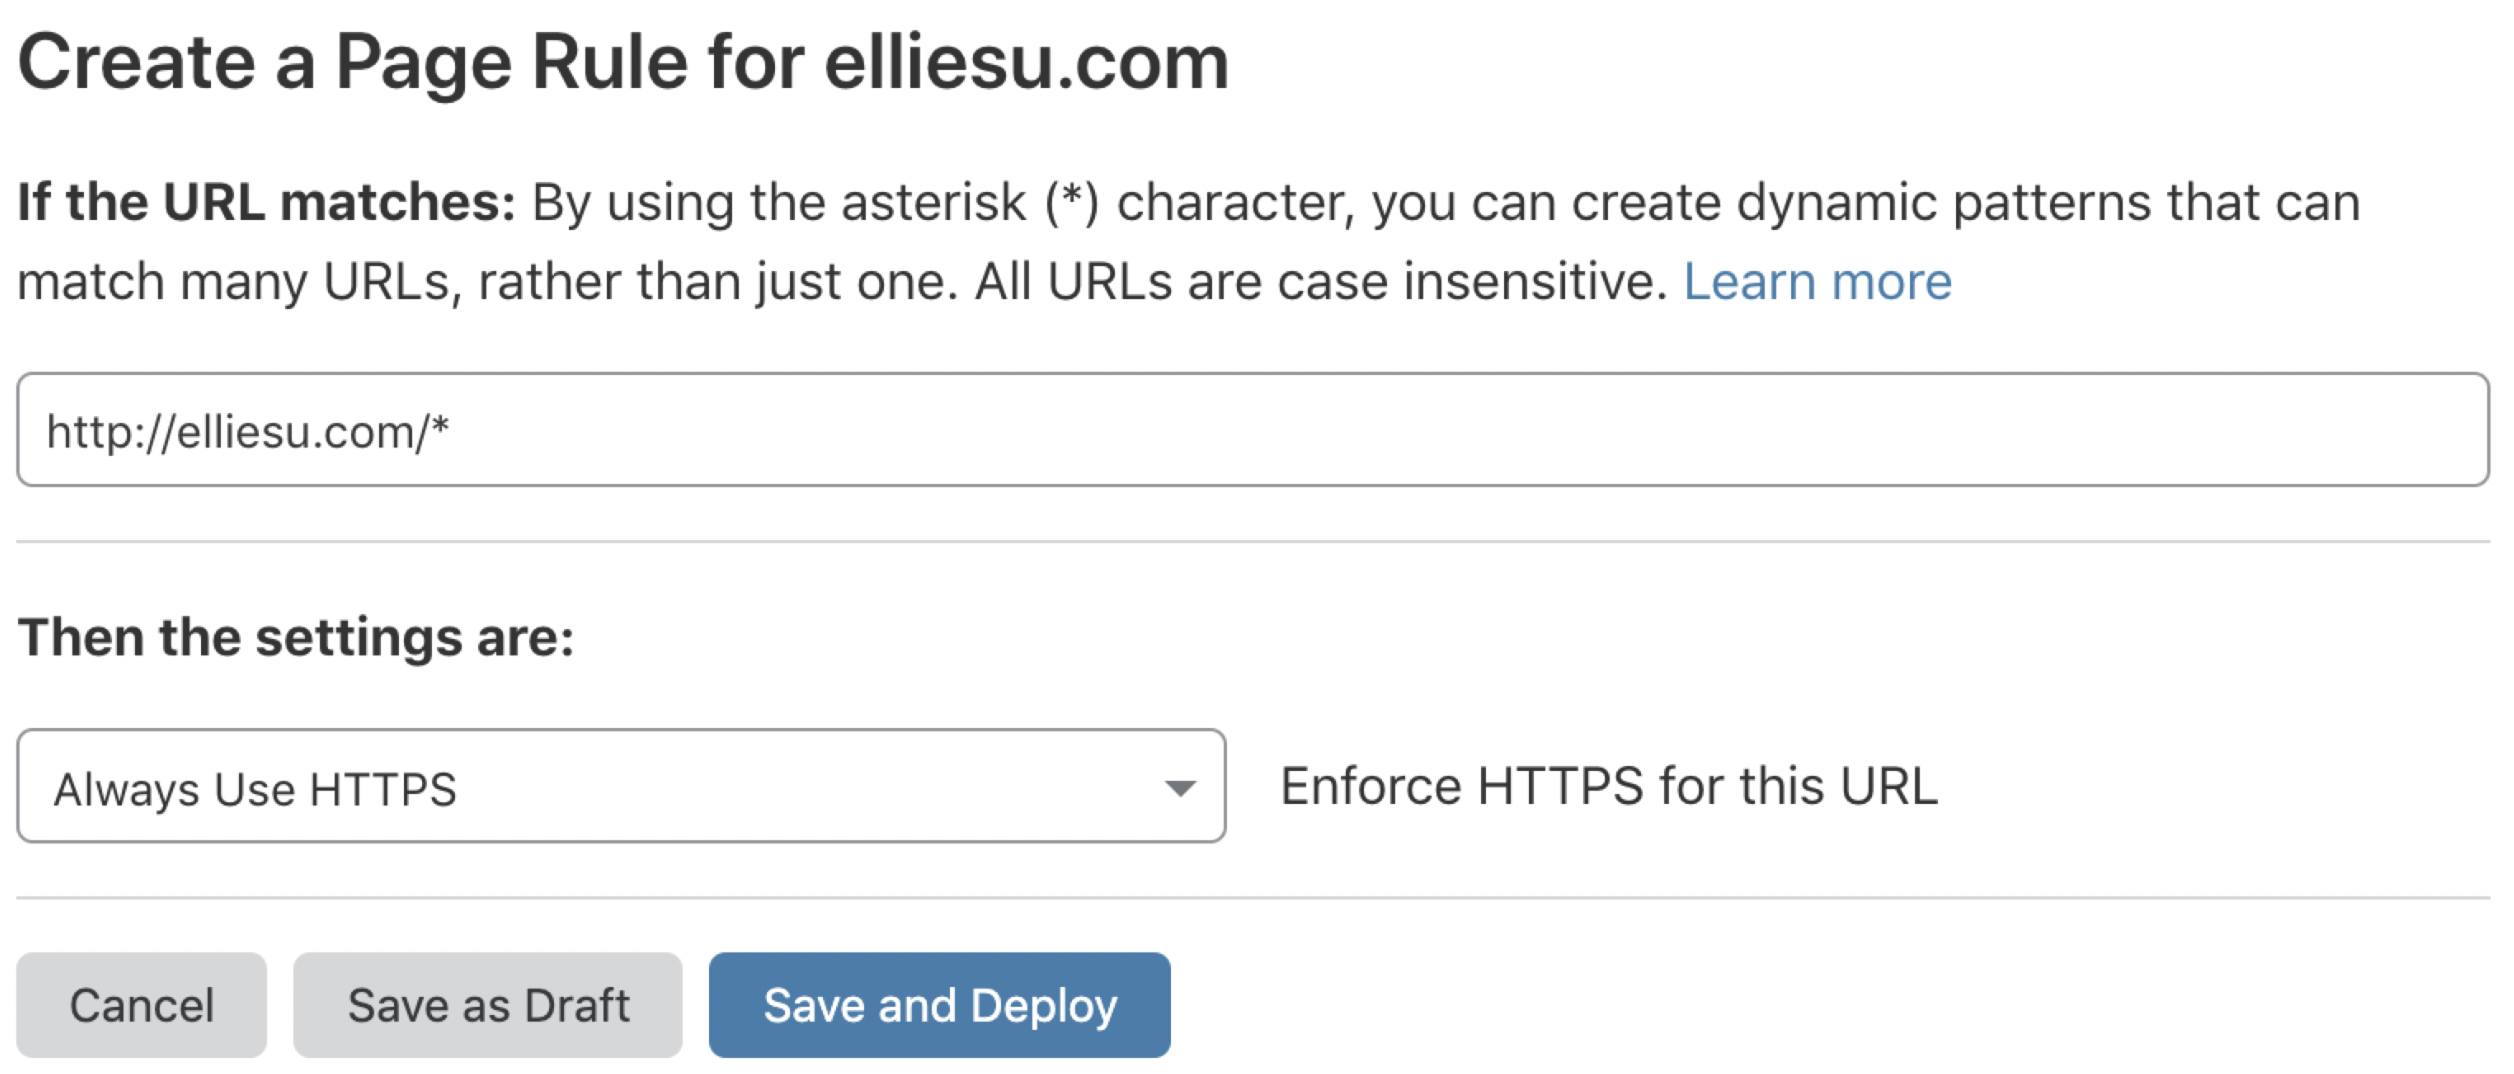
- 設定網域名稱強制導向 HTTPS,上排選單選擇 Page Rules -> Create Page Rules,這邊可以免費設定三個網域,設定 elliesu.com 即可,因為 CNAME www.elliesu.com 有設定導向 @,也就是自己這個網域,所以從 http://www.elliesu.com 進入網站,會導向 elliesu.com,而 elliesu.com 有強制導向 HTTPS,所以只需要設定一個網域即可
Reference
Minos 主題
Managing a custom domain for your GitHub Pages site
Troubleshooting custom domains and GitHub Pages
Google DNS 基本資訊
Godaddy 官方網域說明
How do I redirect all visitors to HTTPS/SSL?
